When it comes to hosting my personal sites (and project homepages) I find just running my own server is both one of the easiest ways to get any amount of flexibility you want with your hosting, and is simpler to debug (usually) but also lets you play around with new technologies with minimal (usually monthly) costs.
For this website and for any other static or semi-static site’s I’m building right now I’m using Astro. So I include some nice little additions specifically for that below.
For the this setup the minimum things I want are:
- Simple server setup
- Host the static files
- Custom domain
- TLS/SSL encryption
- Redirects
- Custom error pages
- Bonus: proxy an API
Setup Your Server
The first step to getting started is to get your server going, you could use any physical server you already have, even a raspberry pi or any of the cheap server hosting providers out there; a static website uses almost no resources and you can easily support thousands of daily visitors on a $5/month server. For this tutorial I’m going to use AWS Lightsail at the $5 level so I can do my compiling right on the server.
First setup your instance: 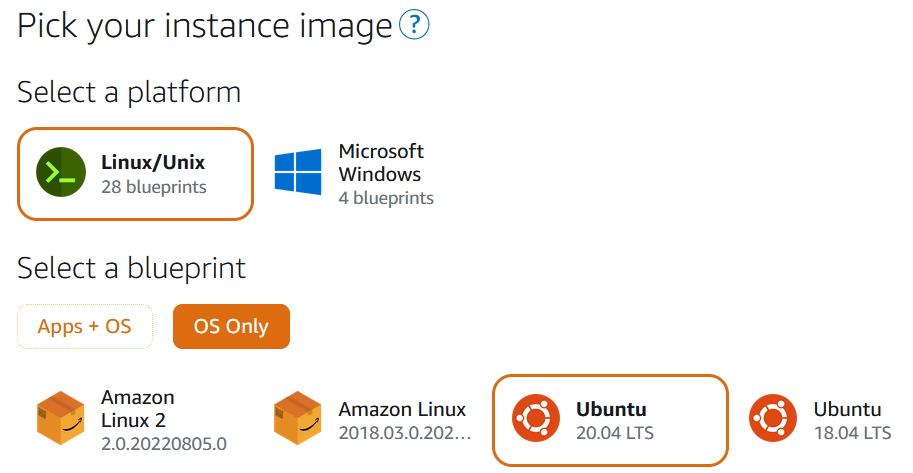
After your instance boots create a static IP and attach it to your instance: 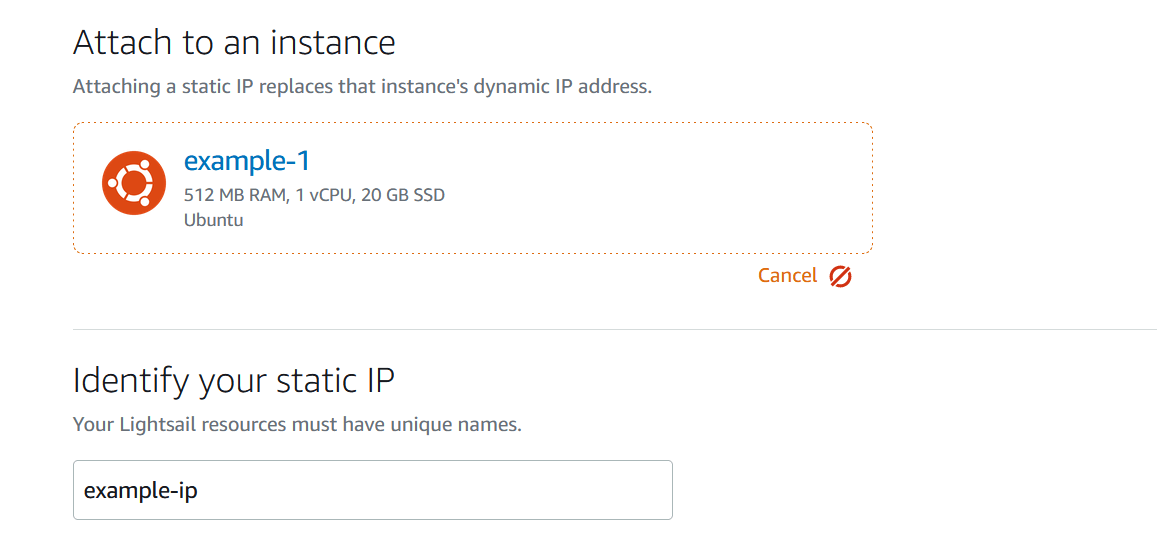
Once you’ve set this up, make note of your new IP address and setup your domain’s DNS. I’ll leave this up to the reader, but your registrar probably has a simple DNS helper for you, or you can use something like AWS Route 53 for what is basically free. (make sure to also setup your www sub domain for our later redirects)
At this point you should be able to SSH into your machine, and we can setup the basics we’ll need: Git, Node.JS and Caddy
curl -sL https://deb.nodesource.com/setup_16.x -o /tmp/nodesource_setup.sh
sudo bash /tmp/nodesource_setup.sh

sudo apt install -y debian-keyring debian-archive-keyring apt-transport-https
curl -1sLf 'https://dl.cloudsmith.io/public/caddy/stable/gpg.key' | sudo gpg --dearmor -o /usr/share/keyrings/caddy-stable-archive-keyring.gpg
curl -1sLf 'https://dl.cloudsmith.io/public/caddy/stable/debian.deb.txt' | sudo tee /etc/apt/sources.list.d/caddy-stable.list
sudo apt update
sudo apt install caddy

sudo apt install git
Note: A more in-depth article on Node.js setup can be found here: https://www.digitalocean.com/community/tutorials/how-to-install-node-js-on-ubuntu-20-04
Setup Caddy
Caddy is a super fast and simple web server with automatic TLS support with LetsEncrypt built in. Setting up a web server is super simple and this is my usual basic Caddyfile setup.
First create a directory where your website will go with something like mkdir /var/www/valstar.dev. Then edit your Caddyfile (you’ll need to do this as root or using sudo) /etc/caddy/Caddyfile:
# /etc/caddy/Caddyfile

valstar.dev {
  tls mikevalstar@gmail.com
  encode zstd gzip
  root * /var/www/valstar.dev/
  header Cache-Control max-age=3600
  file_server {
    precompressed br gzip
  }
  handle_errors {
    rewrite * /404.html
    file_server
  }
}

www.valstar.dev, www3.valstar.dev {
  tls mikevalstar@gmail.com
  redir https://valstar.dev
}
If you create a file similar to the above for your setup it should work right out of the box. After you have the file saved, your DNS is pointing at your server (this is important for the LetsEncrypt process to complete). You can start your server with sudo systemctl start caddy. Then to set caddy to start automatically on boot with: sudo systemctl enable caddy.
If you make any changes to your caddy config, you do not need to restart it, you just want to reload the config with sudo systemctl reload caddy.
With everything running you can add a text file to the folder you setup above and check that your server is running.
Now lets breakdown what the various items in the Caddyfile are doing:
tls mikevalstar@gmail.com - This sets the contact email for your SSL/TLS certificates(s) that will be installed
encode zstd gzip - This will encode any uncompressed files with zstd or gzip as needed (helps to save a tiny bit of bandwidth)
root * /var/www/valstar.dev/ - This sets what file’s it will serve up
header Cache-Control max-age=3600 - This will set your site to tell the browser to cache things for 1 hour (optional)
precompressed br gzip - This line under the file_server directive will serve pre-compressed files in place of the basic files when supported by the browser. See the BR compression section below for more details.
handle_errors - This gives us a nice 404 page, you can do more with this directive but with static files, you’re not really going to have anything other then a 404.
redir https://valstar.dev - A simple redirect to another website if the user goes to the wrong domain (in this case www)
Astro Setup & Tweaks
As part of any basic Astro build setup it will generate your website into a /dist/ folder, this is what you’re going to want to host with Caddy above. But before we get started you’re going to want to make a few tweaks to your Astro setup to make sure we have everything covered.
Error page
Firstly we need an error page that we will call 404, in my setup this means adding a /src/404.astro file and we’re all set. After you’ve added this page to your liking confirm the location it builds to corresponds to the Caddyfile above.
Robots file
Lets add in a robots file to the public folder so we can make sure our website is indexed including our sitemap:
User-agent: *
Disallow:

User-agent: *
Sitemap: https://valstar.dev/sitemap-index.xml
BR & Gzip compression
Lastly we want to add in pre-compression to our Astro app. We are going to pre-compress all of our text-based files to make them smaller then they otherwise would be. Caddy by default will gzip all traffic going through it for browsers that support it, however this does take some processing power; so if we compress the files once only when we build our site we can save on that processing time.
But why brotli and gzip? Brotli was introduced by Google many years ago and has been supported by all of the most common browsers since around 2018 (notably not IE11) and is ~15% better then gzip for space saving; however it is much more processor intensive and should not be done on-the-fly so we’re going to compile them at build time. However we’re going to also gzip teh files as well because many older tools may not support brotli and we need a very commonly supported option… gzip.
Add in vite-plugin-compression to your project and setup your astro.config.mjs to be something similar to this:
import { defineConfig } from 'astro/config';
import mdx from '@astrojs/mdx';
import sitemap from '@astrojs/sitemap';
import react from '@astrojs/react';
import compress from 'vite-plugin-compression';

// https://astro.build/config
export default defineConfig({
  site: 'https://valstar.dev',
  integrations: [mdx(), sitemap(), react()],
  markdown: {
    syntaxHighlight: 'prism',
  },
  vite: {
    plugins: [compress({ ext: '.br', algorithm: 'brotliCompress' }), compress({ ext: '.gz', algorithm: 'gzip' })],
  },
});
Next time you build you should see copies of all your files with a .br and .gz extensions.
Deploy Script
Lastly we need to set the site up to deploy. We dont want to just host the standard dist folder as it clears out during the build and may cause issues with your users. So first we need to build with npm run build, then copy the files to the folder we are hosting in the Caddy hosted folder.
yarn run build
cp -r dist/* /var/www/valstar.dev/
And that’s it, you should have a fully hosted website.
Bonus: Proxy an API
For many of my static sites I usually have 1 or 2 APIs that may need to be called. I will usually run these services with PM2 to keep them running, but how do we add the API(s) to Caddy:
valstar.dev {
  ...
  reverse_proxy /query* http://127.0.0.1:6170
  ...
}
And now /query* will be proxied to our internal node server.